Imagine a space: raw, unfinished walls, exposed pipes snaking across the ceiling, and the faint scent of drywall dust hanging in the air. This is the reality of an unfinished bathroom, a blank canvas awaiting transformation. Yet, within this seemingly chaotic landscape lies the potential for a stunning, modern sanctuary, especially when incorporating the sleek efficiency of wall-mounted fixtures.
This exploration delves into the intricacies of completing such a space, from navigating the complexities of plumbing and electrical work to selecting the perfect materials and crafting a design that balances functionality with aesthetic appeal. We’ll examine the advantages and disadvantages of wall-mounted fixtures, address safety concerns, and provide a practical guide to budgeting and material selection for a successful renovation.
The journey from unfinished shell to a fully functional bathroom involves careful planning and execution. Understanding the unique challenges presented by an unfinished bathroom, particularly when integrating wall-mounted fixtures, is crucial. This necessitates a deep dive into plumbing and electrical requirements, material choices, and design considerations, all while adhering to safety regulations and budget constraints. The following sections will unpack these aspects, providing a comprehensive roadmap for transforming this potential hazard into a beautiful and safe bathroom.
Wall-Mounted Fixtures
Wall-mounted bathroom fixtures represent a significant design shift in bathroom architecture, moving away from the traditional floor-standing models. This change offers a variety of advantages and disadvantages that homeowners should carefully consider before making a decision. The choice between wall-mounted and floor-standing fixtures significantly impacts both the aesthetic and functional aspects of a bathroom.
Advantages of Wall-Mounted Fixtures
Wall-mounted sinks, toilets, and vanities offer a compelling solution for maximizing space, particularly in smaller bathrooms. By removing the bulk of the fixture from the floor, more floor area becomes available for movement and the placement of other furniture or accessories. This creates a sense of openness and spaciousness, visually expanding the perceived size of the room. Furthermore, the streamlined design often contributes to a more modern and minimalist aesthetic.
The ease of cleaning under and around wall-mounted fixtures is another significant advantage. The absence of a base or pedestal eliminates hard-to-reach areas, simplifying cleaning routines and reducing the buildup of dirt and grime.
Disadvantages of Wall-Mounted Fixtures
The installation of wall-mounted fixtures is considerably more complex than their floor-standing counterparts. It requires specialized plumbing knowledge and expertise, often necessitating the services of a professional plumber. This adds to the overall cost of the renovation. Moreover, repairs can also prove more challenging and expensive. Any issues with the internal plumbing or the wall mounting system necessitate opening up the wall, potentially leading to significant disruption and repair costs.
Leaks, for instance, can cause substantial water damage if not detected and addressed promptly. The weight of the fixture must also be carefully considered during installation to ensure proper support and prevent structural damage to the wall.
Comparison of Wall-Mounted and Floor-Standing Fixtures
The following table summarizes the key differences between wall-mounted and floor-standing bathroom fixtures:
| Feature | Wall-Mounted | Floor-Standing | Notes |
|---|---|---|---|
| Space Efficiency | High; maximizes floor space | Low; occupies floor space | Especially beneficial in smaller bathrooms. |
| Installation Complexity | High; requires specialized plumbing | Low; relatively straightforward | Professional installation often required for wall-mounted fixtures. |
| Repair Difficulty | High; often requires wall access | Low; generally easier to access and repair | Wall-mounted repairs can be costly and disruptive. |
| Aesthetic Appeal | Modern, minimalist, clean lines | Traditional, classic, varied styles | Aesthetic preference is subjective and depends on overall bathroom design. |
Unfinished Bathroom Considerations
The seemingly simple act of leaving a bathroom unfinished can have far-reaching consequences, impacting not only the immediate livability of a home but also its long-term value and the safety of its occupants. Understanding the reasons behind unfinished bathrooms, their financial implications, and the associated risks is crucial for homeowners and prospective buyers alike. This section delves into these critical aspects, providing insights into the complexities of incomplete bathroom renovations.Unfinished bathrooms are often a result of several factors, ranging from budgetary constraints and unforeseen circumstances to changes in priorities and homeowner indecisiveness.
Financial limitations frequently lead to projects being stalled mid-way, with essential components like tiling, fixtures, or even basic waterproofing left incomplete. Unexpected issues, such as discovering hidden plumbing problems or encountering structural difficulties during demolition, can also halt progress indefinitely. In other cases, shifting life circumstances, like a job relocation or a change in family plans, might cause homeowners to abandon renovation efforts.
Sometimes, the sheer complexity of a bathroom remodel overwhelms homeowners, leading to procrastination and ultimately, an unfinished space.
Reasons for Unfinished Bathrooms
Budgetary limitations are a primary driver of unfinished bathroom projects. For instance, a homeowner might initially allocate $10,000 for a renovation, but unforeseen expenses related to plumbing repairs or material cost increases could easily deplete the budget, leaving the project incomplete. Similarly, unexpected structural issues, such as discovering rotted subflooring requiring extensive repairs, can significantly increase the overall cost and cause homeowners to halt the project due to financial constraints.
A lack of planning and budgeting is a frequent contributor; failing to adequately assess the total cost upfront leads to financial surprises that can derail the project.
Impact on Home Value
An unfinished bathroom significantly diminishes a home’s market value. Appraisers typically deduct a considerable amount from the property’s overall worth when assessing incomplete or substandard renovations. The extent of the deduction depends on the severity of the incompletion; a bathroom lacking only cosmetic finishes might result in a smaller reduction compared to one with major structural or plumbing deficiencies.
For example, a home valued at $300,000 might see a reduction of $5,000-$15,000 or more, depending on the extent of the unfinished work and the overall condition of the bathroom. This financial impact makes it harder to sell the property and can result in a lower selling price than anticipated. Potential buyers often perceive unfinished bathrooms as a sign of neglect or poor maintenance, impacting their willingness to purchase the home.
Safety Hazards in Unfinished Bathrooms
Unfinished bathrooms pose several safety hazards. Exposed wiring, for instance, presents a significant risk of electric shock, particularly if the wiring is not properly insulated or protected. Similarly, incomplete plumbing can lead to water leaks, causing mold growth and potential structural damage. The absence of proper ventilation can lead to the buildup of moisture, further exacerbating mold growth and creating an unhealthy environment.
Furthermore, unsecured materials, such as exposed studs or sharp edges of unfinished cabinetry, can lead to injuries during accidental contact. Lack of adequate lighting in an unfinished bathroom increases the risk of falls and injuries. These hazards not only pose immediate risks to occupants but can also lead to costly repairs in the long run.
Plumbing and Electrical Considerations for Completion

Completing an unfinished bathroom with wall-mounted fixtures requires careful planning and execution of both plumbing and electrical rough-ins. These systems must be installed correctly and to code to ensure both functionality and safety. Failure to do so can lead to leaks, electrical hazards, and costly repairs later. This section details the crucial steps involved in these processes.
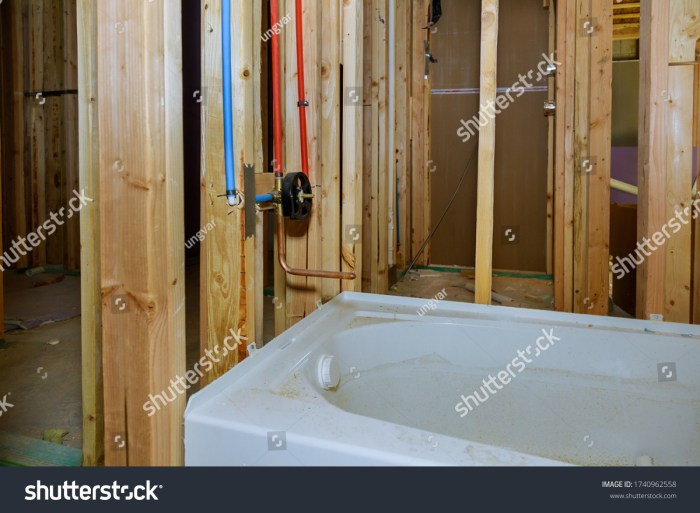
Rough-In Plumbing for Wall-Mounted Fixtures
Precise plumbing rough-in is paramount for seamless wall-mounted fixture installation. This involves positioning and securing the water supply lines and drainpipes before the walls are closed. Accurate measurements and adherence to building codes are essential to prevent future problems. The following steps Artikel a typical process:
- Locate and Mark Fixture Positions: Using the fixture manufacturer’s specifications and your bathroom layout, precisely mark the locations for each wall-mounted fixture (sink, toilet, showerhead) on the wall studs. This step dictates the placement of all plumbing components.
- Install Water Supply Valves: Install shut-off valves for each fixture at the marked locations. These valves allow for easy water shutoff in case of repairs or maintenance. Ensure these valves are easily accessible after the wall is finished. Copper or PEX piping is commonly used for supply lines.
- Run Water Supply Lines: Route the water supply lines from the main water supply to the shut-off valves, using appropriate fittings and ensuring proper slope for drainage. Secure the pipes to the wall studs with appropriate clamps.
- Install Drain Lines: Install drain lines, ensuring proper venting and slope to prevent clogs. Use appropriate fittings and seal all connections to prevent leaks. PVC is a common material for drain lines.
- Pressure Test: After all connections are made, conduct a thorough pressure test to identify and repair any leaks before closing the walls. This involves pressurizing the system and observing for any pressure drops.
Electrical Wiring for Wall-Mounted Fixtures
Proper electrical wiring is critical for the safe and reliable operation of wall-mounted lighting and power outlets. Incorrect wiring can lead to short circuits, fire hazards, and electrical shocks. These steps Artikel best practices:
- Plan Circuit Layout: Determine the number and location of lighting fixtures and outlets. Consider the power requirements of each fixture and plan circuits accordingly. A dedicated circuit for bathroom GFCI outlets is essential for safety.
- Run Wiring: Route electrical wiring from the breaker panel to each fixture and outlet location. Use appropriately sized wiring and secure it to the wall studs with staples or cable clamps. Use metal conduit for added protection and safety.
- Install Junction Boxes: Install junction boxes at each fixture and outlet location. These boxes provide a safe and secure enclosure for the wiring connections.
- Install Outlets and Switches: Install GFCI-protected outlets and switches according to the National Electrical Code (NEC). Ensure proper grounding to prevent electrical shocks. These outlets are specifically designed for wet locations and provide additional safety.
- Inspect and Test: After installation, conduct a thorough inspection to ensure all wiring is correctly connected and grounded. Test all outlets and switches to ensure they are functioning correctly.
Plumbing and Electrical Component Placement Diagram
Imagine a simple diagram showing a side view of a bathroom wall. The left side shows the main water supply pipe entering from the wall, branching off into two separate lines, each leading to a shut-off valve. These valves are located at the height suitable for a sink and a shower, respectively. From each valve, smaller pipes extend to their respective fixtures.
Below the valves, drain pipes descend vertically to the main drain line exiting at the bottom. On the right side, electrical conduit runs vertically from the ceiling, branching out to junction boxes positioned for a light fixture and a GFCI outlet near the sink. The conduit is clearly visible alongside the plumbing lines, but spaced apart to maintain code-required clearances.
All components are neatly labeled for clarity. This diagram emphasizes the careful planning required to avoid conflicts between plumbing and electrical systems. Remember that the actual arrangement will vary depending on the bathroom’s specific layout and fixture choices. Consulting with a qualified electrician and plumber is crucial for accurate placement.
Material Selection for an Unfinished Bathroom
The choice of materials for an unfinished bathroom significantly impacts its longevity, aesthetic appeal, and overall functionality. Careful consideration of durability, water resistance, and maintenance requirements is crucial, especially given the unique challenges posed by a consistently humid environment. Selecting appropriate materials at this stage prevents costly repairs and renovations down the line.
Bathroom Wall Materials
The walls of a bathroom require materials that can withstand moisture and frequent cleaning. Three popular choices are tile, paint, and wainscoting, each with its own set of advantages and disadvantages.
- Tile: Ceramic and porcelain tiles offer exceptional water resistance and durability. Their longevity is unmatched, with properly installed tiles lasting for decades. However, tile installation is labor-intensive and can be expensive. The grout between tiles requires regular cleaning to prevent mold and mildew growth. The initial cost is relatively high, but the long-term value is significant.
A wide variety of colors, patterns, and textures are available, allowing for extensive design flexibility.
- Paint: Painting bathroom walls is a cost-effective and quick solution. However, paint’s water resistance depends heavily on the type of paint used. High-quality, moisture-resistant paints with a mildew-resistant additive are essential for bathroom applications. Regular repainting may be required due to wear and tear, especially in high-traffic areas. While offering design flexibility, paint is less durable than tile and is more susceptible to damage from water splashes or spills.
- Wainscoting: Wainscoting, typically made of wood or PVC, provides a classic and elegant look. PVC wainscoting is particularly suitable for bathrooms due to its water resistance and easy maintenance. Wood wainscoting requires regular sealing to protect it from moisture. Wainscoting is relatively easy to install compared to tile, but it offers less protection against water damage than tile.
The initial cost is moderate, and the lifespan depends on the material and maintenance.
Bathroom Flooring Options
Bathroom flooring must be durable, water-resistant, and slip-resistant. Several options cater to these requirements, each with its own unique characteristics.
- Ceramic and Porcelain Tile: Similar to wall tiles, these are highly water-resistant and durable. They are available in a wide range of styles and colors, offering significant design flexibility. Proper sealing of grout is crucial for longevity. Porcelain tiles are generally denser and more water-resistant than ceramic tiles.
- Vinyl: Vinyl flooring is a cost-effective option offering good water resistance and durability. It’s available in various designs mimicking other materials like stone or wood. However, vinyl can be less durable than tile and may show wear and tear over time. Luxury vinyl plank (LVP) and luxury vinyl tile (LVT) offer increased durability and realism compared to standard vinyl sheets.
- Natural Stone: Materials like marble, granite, and slate offer a luxurious look but require careful sealing to protect against water damage. They can be slippery when wet, so proper anti-slip treatments are essential. Natural stone is generally more expensive than other options and requires more maintenance.
Countertop Materials
Countertops in a bathroom need to withstand moisture, cleaning products, and potential impacts. Several materials meet these requirements, each with its own trade-offs.
- Granite: Granite is a durable and elegant natural stone known for its resistance to scratches and stains. Proper sealing is necessary to protect against water damage. Granite is relatively expensive but offers a luxurious look and long-term durability. Its inherent variations in color and pattern provide unique character.
- Quartz: Engineered quartz countertops are highly durable, non-porous, and resistant to stains and scratches. They are less expensive than granite and require minimal maintenance. A wide variety of colors and patterns are available, often mimicking the look of natural stone. The uniform nature of quartz can be seen as less natural than granite.
- Laminate: Laminate countertops are the most budget-friendly option. They are relatively easy to install and maintain. However, laminate is less durable than granite or quartz and is more susceptible to scratches, stains, and water damage. While offering a wide range of designs, laminate’s lifespan is significantly shorter than stone countertops. Proper sealing of the edges is crucial for water resistance.
Design Ideas for an Unfinished Bathroom with Wall-Mounted Fixtures
The inherent flexibility of wall-mounted fixtures allows for a diverse range of bathroom designs, transcending traditional limitations of space and plumbing configurations. This opens up exciting possibilities for creating unique and personalized spaces, tailored to individual preferences and the overall architectural style of the home. The following examples illustrate how different aesthetic approaches can be achieved through careful selection of fixtures and materials.
Modern Bathroom Design with Wall-Mounted Fixtures
The modern aesthetic prioritizes clean lines, minimalist forms, and a focus on functionality. This design emphasizes a sense of spaciousness and tranquility.
- Fixtures: Sleek, rectangular wall-mounted sink with integrated faucet; a wall-hung toilet with a concealed cistern; a frameless glass shower enclosure with a wall-mounted shower head and hand shower.
- Materials: High-gloss white ceramic tiles for the walls and floor; a polished concrete vanity top; chrome-finished fixtures; tempered glass shower enclosure.
- Aesthetic: The overall aesthetic is characterized by its simplicity and elegance. The absence of clutter contributes to a feeling of openness and serenity. The color palette is predominantly white and gray, with subtle accents of chrome. Natural light is maximized through the use of large windows or skylights.
Traditional Bathroom Design with Wall-Mounted Fixtures
Traditional design evokes a sense of classic elegance and timeless style, drawing inspiration from historical architectural details and craftsmanship. This approach often incorporates ornate details and rich materials.
- Fixtures: A pedestal sink with a traditional style faucet; a wall-hung toilet with a skirted base; a shower enclosure with a curved shower rod and a shower head with a vintage-inspired design.
- Materials: Subtle patterned ceramic tiles in warm earth tones; a marble or granite vanity top; brass or brushed nickel fixtures; a patterned shower curtain.
- Aesthetic: This design features a sense of warmth and sophistication. The materials and fixtures create a feeling of luxury and comfort. The color palette is often based on warm neutrals, with accents of gold or bronze.
Rustic Bathroom Design with Wall-Mounted Fixtures
A rustic bathroom design embraces natural materials and a relaxed, informal aesthetic. This style often features reclaimed wood, stone, and other natural elements.
- Fixtures: A simple, farmhouse-style wall-mounted sink with a ceramic basin; a wall-hung toilet with a simple design; a walk-in shower with a rainfall shower head and natural stone walls.
- Materials: Reclaimed wood beams on the ceiling; natural stone tiles or slate flooring; exposed brick walls; matte black fixtures; a woven cotton shower curtain.
- Aesthetic: The overall aesthetic is characterized by its warmth and natural feel. The materials and fixtures create a cozy and inviting atmosphere. The color palette is typically composed of earth tones, with accents of black or dark brown.
Lighting Choices to Enhance Bathroom Design
Strategic lighting is crucial in enhancing the atmosphere and functionality of a bathroom with wall-mounted fixtures. Recessed lighting can provide even illumination, while vanity lighting can highlight the sink area. Accent lighting can be used to draw attention to specific features, such as a unique tile pattern or a piece of artwork. In a modern bathroom, LED strip lighting beneath the vanity can create a sleek, contemporary look.
In a traditional setting, sconces on either side of the mirror offer a classic, elegant touch. For a rustic bathroom, pendant lights made of natural materials, such as wood or bamboo, can complement the overall design.
Incorporating Storage Solutions in a Wall-Mounted Fixture Bathroom
Wall-mounted cabinets and shelves are ideal for maximizing storage space in a bathroom with wall-mounted fixtures. These solutions keep toiletries and other items organized while maintaining a clean, uncluttered look. Open shelving can showcase decorative items, while closed cabinets offer concealed storage. A floating vanity with drawers can provide ample storage space while maintaining a minimalist aesthetic.
Utilizing vertical space with tall, narrow cabinets can maximize storage capacity without overwhelming the room. In smaller bathrooms, mirrored cabinets can serve a dual purpose, providing both storage and reflection.
Budgeting and Cost Estimation for Bathroom Completion
Completing a bathroom renovation, whether a simple refresh or a complete overhaul, requires careful budgeting. Understanding the typical cost breakdown allows for informed decision-making and prevents costly overruns. This section details the typical expenses involved and provides strategies for effective budget management. Accurate cost estimation hinges on a detailed understanding of the project scope and material choices.
Typical Cost Components of a Bathroom Renovation
Bathroom renovation costs are highly variable, depending on factors such as location, project size, material choices, and the level of customization. However, a general breakdown of costs typically includes materials, labor, and permits. Materials encompass everything from fixtures (toilets, sinks, showers) and tiling to cabinetry and flooring. Labor costs represent the skilled tradespeople involved, including plumbers, electricians, and general contractors.
Permits are necessary for legal compliance and vary by location. A small bathroom remodel might cost between $5,000 and $15,000, while a larger, high-end renovation could easily exceed $30,000 or more. These figures are estimates and should be adjusted based on specific project needs and regional pricing.
Strategies for Staying Within Budget
Effective budget management is crucial for a successful renovation. Prioritizing needs versus wants is a key strategy. For instance, while high-end fixtures are aesthetically pleasing, more affordable yet durable alternatives can achieve a similar outcome without significantly compromising quality. Detailed planning, including comprehensive material lists and accurate labor estimations, minimizes unexpected expenses. Seeking multiple quotes from contractors allows for comparison and selection of the most competitive pricing.
Staggering purchases and leveraging seasonal sales can also contribute to cost savings. Finally, carefully considering DIY options for simpler tasks, such as painting or basic tiling, can further reduce labor costs, provided you possess the necessary skills and time.
Sample Budget Breakdown
The following table provides a sample budget breakdown for a mid-range bathroom renovation. Remember that these figures are estimates and will vary based on specific project needs and location. It’s crucial to adjust these values to reflect your chosen materials and labor rates.
| Item | Quantity | Unit Cost | Total Cost |
|---|---|---|---|
| Toilet | 1 | $300 | $300 |
| Sink and Vanity | 1 | $800 | $800 |
| Shower Fixture | 1 | $500 | $500 |
| Tile (Floor and Walls) | 100 sq ft | $10/sq ft | $1000 |
| Flooring (excluding tile) | 20 sq ft | $25/sq ft | $500 |
| Plumbing Supplies | Various | $500 | $500 |
| Electrical Supplies | Various | $300 | $300 |
| Labor (Plumbing) | 10 hours | $75/hour | $750 |
| Labor (Electrical) | 5 hours | $75/hour | $375 |
| Labor (General Contractor) | 20 hours | $60/hour | $1200 |
| Permits | 1 | $200 | $200 |
| Total Estimated Cost | $6,225 |
Visual Representation
The stark contrast between an unfinished and a completed bathroom reveals the transformative power of careful planning and execution. Understanding this visual difference is crucial for homeowners embarking on bathroom renovations, allowing them to anticipate the final result and manage expectations throughout the process. The following descriptions aim to provide a clear picture of both stages.
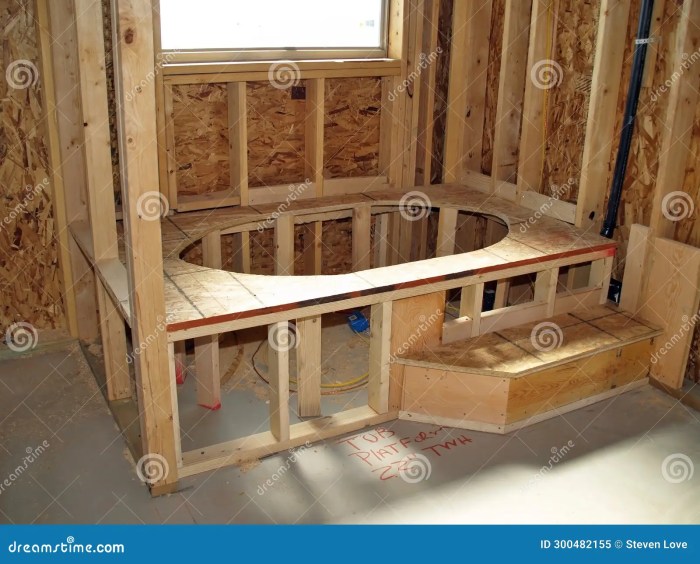
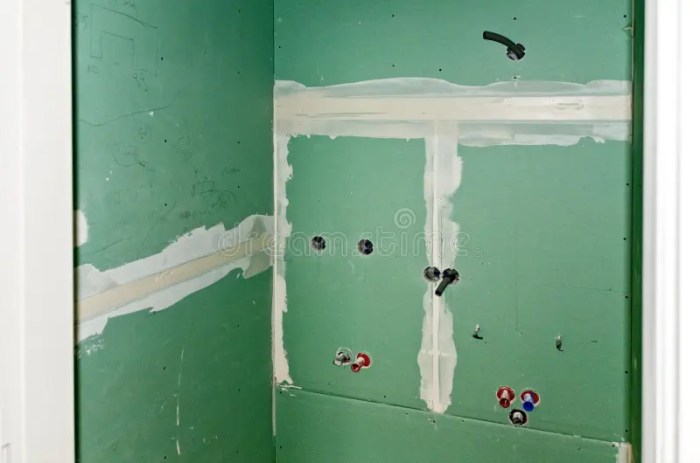
An unfinished bathroom, in its raw state, often presents a scene of exposed infrastructure. Imagine a space, perhaps 8 feet by 6 feet, with unfinished drywall, revealing the underlying studs and insulation. Pipes, varying in diameter from half an inch to two inches, snake across the walls and floor, their metallic gleam contrasting sharply with the dusty, grey drywall.
Electrical wiring, neatly bundled but exposed, runs alongside the plumbing, adding to the industrial aesthetic. The floor may be bare concrete, showing imperfections and possibly even staining from the construction process. In this state, the space lacks the defining elements of a functional bathroom – the shower, the toilet, and the vanity are all absent, leaving only the skeletal framework of the room.
Unfinished Bathroom Description
This unfinished space, regardless of its size or shape (which can vary significantly from a compact powder room to a large master bathroom), generally evokes a feeling of incompleteness and potential. Unique features, such as a recessed area for a future shower, or an oddly shaped alcove, are clearly visible in this unadorned state. These features, initially perceived as obstacles, often become design opportunities once the space is fully realized.
The absence of tiling, fixtures, and cabinetry leaves the true dimensions and proportions of the room unobscured, allowing for a clearer understanding of the available space. The overall impression is one of raw functionality, a far cry from the finished product.
Completed Bathroom with Wall-Mounted Fixtures Description
In stark contrast, the completed bathroom, featuring wall-mounted fixtures, showcases a seamless blend of functionality and aesthetics. The same 8×6 foot space now radiates a sense of calm and sophistication. The walls, clad in elegant tiles or painted in a soothing color, conceal the plumbing and electrical work. A sleek, wall-mounted vanity, crafted from high-quality materials such as marble or lacquered wood, provides ample storage and a clean countertop.
The toilet, also wall-mounted, contributes to the feeling of spaciousness and ease of cleaning. A modern, frameless shower enclosure, fitted with a rainfall showerhead, completes the transformation. The lighting, carefully planned and executed, illuminates the space evenly, highlighting the chosen materials and design elements. The floor, perhaps tiled with large-format porcelain, complements the wall coverings and enhances the overall aesthetic.
The unique features, previously viewed as challenges, are now incorporated seamlessly into the design, adding character and charm to the finished space. The completed bathroom is a testament to thoughtful planning and precise execution, transforming a raw, functional space into a sanctuary of comfort and style.
Closing Summary
Completing an unfinished bathroom with wall-mounted fixtures is a rewarding, albeit challenging, undertaking. Careful planning, a methodical approach to plumbing and electrical work, and thoughtful material selection are paramount to success. From the initial assessment of the space and its unique characteristics to the final touches that elevate the design, every step contributes to the overall outcome. By understanding the advantages and disadvantages of wall-mounted fixtures, addressing potential safety concerns, and meticulously managing the budget, homeowners can transform a potentially hazardous space into a functional, aesthetically pleasing, and valuable addition to their home.
The result: a bathroom that seamlessly blends modern convenience with personalized style, a testament to careful planning and skillful execution.
FAQ Overview
What are the long-term maintenance implications of wall-mounted fixtures?
While initial installation might be more complex, long-term maintenance can be simpler with easier access to internal components for repairs. However, leaks behind the walls can be more difficult to detect and repair, necessitating regular inspections.
How does the choice of wall material affect the installation of wall-mounted fixtures?
The type of wall material (drywall, concrete, etc.) dictates the appropriate anchoring methods and potentially requires specialized tools and techniques for secure installation. Consult a professional for guidance on suitable mounting solutions for your specific wall type.
Can I install wall-mounted fixtures myself, or is professional help necessary?
While some simpler fixtures may allow for DIY installation, complex setups, particularly those involving plumbing and electrical work, necessitate professional expertise to ensure safety and code compliance. Improper installation can lead to leaks, electrical hazards, and structural damage.
What are the potential code violations to watch out for during the renovation?
Common violations include improper venting, insufficient GFCI protection for electrical outlets, non-compliant plumbing fixtures, and inadequate waterproofing. Always check local building codes and obtain necessary permits before starting the renovation.
How can I ensure proper ventilation in a bathroom with wall-mounted fixtures?
Adequate ventilation is crucial to prevent mold and mildew growth. This typically involves installing an exhaust fan with sufficient CFM (cubic feet per minute) rating, sized appropriately for the bathroom’s volume. Proper venting also needs to be connected to the exterior of the building.